Upload data and create layers
Vector data Upload data Create layer Add visual styles Raster data Upload data Create layer IntroductionThis tutorial will guide you through creating layers from your vector and raster data. To add vector data you need to upload shapefiles using Database tab. Create a vector layer in an existing node in the Layers tab. Configure classes, styles and labels. To add raster data you need to have your rasters on the server file system preferably in the "raster" folder of Giscuit. Create a raster layer in an existing node in the Layers tab. Vector dataUpload dataFor this example we will add a Roads layer from OpenStreetMap data for Moldova (you can download OpenStreetMap data for your country here). Download the archive and extract it somewhere on your file system. Go to Database tab. Click Upload button to add new data and populate fields with the following values:
Click Submit to upload your data. If errors or warnings appear then the upload process failed (notices are for informational purposes), read carefully through them and correct your data or uploading options. For more detailed information see Database. Create layerAfter uploading your data to the database, you can create layers from it. To create a layer go to Layers tab. Right click on the Root node under Manage layers and click Add
Click Expand under Manage layers, right click on the Moldova node and select Add.
This will create a vector layer Mdroads using the moldova_roads table in the Moldova container with a default class and style with random color. By default layer will be visible to members of the Registered role. Add visual stylesLets create three visual styles for Roads to get better understanding of classes and styles. First style will be applied to trunk and primary roads, second style will be for secondary and tertiary, and third one for all other types of roads. In the Layers tab under Manage layers, click Expand. Right click on Roads node and select Edit. Click on Fields tab. Select "type" field, than double click on Visibility value and set Everywhere. In order to use table fields in class expressions you need to set Visibility value of the field to Mapstyle or Everywhere. Click on Classes and Styles tab. Click Add in Classes table. Select newly created row and populate (double click to edit) it with the following values:
Click Add in Classes table. Select newly created row and populate (double click to edit) it with the following values:
Select mdroads_default in Classes data table, then select the only available style in Styles data table.
Click Submit to apply the changes. You can now see how your styles for Roads layer are rendered. 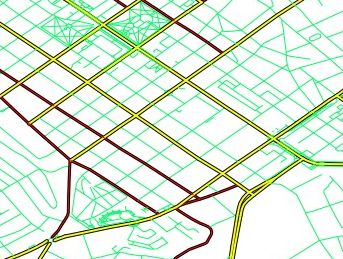
For more details on vector layer options descriptions see Edit vector layer. Raster dataUpload dataYou should copy your raster data to the Giscuit "raster". Raster data should be in one of the GDAL Raster Formats. Download sample raster data from here. Unpack and move files to "C:\ms4w\Apache\htdocs\giscuit\raster" (Microsoft Windows) or "/vaw/www/giscuit/raster" (Linux) folder. Create layerTo create a layer go to Layers tab, right click on the Moldova node under Manage layers and click Add
For more details on raster layer options descriptions see Edit raster layer.
COPYRIGHT ® 2012, VEC |